Sunday, 30 November 2014

Slight Change Of Idea

I've been experimenting with a few different ideas with the pin curls at the front of the hair. I've decided to incorporate a braid into the middle section of the pin curls. I started off by pinning the hair at the front but using the plat I twisted it around to use it as its own pin curl.
I liked the effect it gave and want to use dry shampoo for the actual assessment to show a decorative part of my design. I think I want the snow effect to only be on the middle pin curl so that it gives a hint of frostyness but doesn't overpower my piece. 

My idea was badly pinned here due to not having the correct grips, but just to show the idea this is what I want:

Saturday, 29 November 2014

Four Images Which Have Infuenced My Final Design

I've been looking through some different hair designs found on Pinterest.com. I'm trying to gather ideas to start designing my final design. I feel I want to use a heart shaped design which can be adapted to be more contemporary. 
Reference: http://uk.pinterest.com/pin/366128644680996425/

This image shows a heart shaped effect with large pin curls at the front I love the way the pin curls almost look like flower buds, this is something I'm definitely going to include at the front of my design. The hair is also slightly messy and backcombed, it shows the curl detail on the backcombed area too which I find interesting. 


This image really inspired me, I found it from Avant Guarde Hair. The hair is textured and flows down the back with body. It reminded me of really large crimped hair as if the crimpers were used on a giants hair! I want to try and find a technique that'll do something similar to this. I'm going to try with straighteners back and forth to see if it gives some kind of effect similar. I like the stiffness look it gives. It's very edgy and high fashion.


Hair and Makeup by 'Admin' of the znnw.com site
This look really relates to Queen Elizabeth, the pale skin, rosy cheeks, invisible eyebrows and softly pink lips. The hair is something I found really interesting too. The padding has height with the pattern of the crimp on top of it showing a decorative way to style the padding underneath. I hope to use a crimping/curling pattern on the top of my padding/quiffs. 


Reference: http://media-cache-ak0.pinimg.com/originals/78/2b/9b/782b9b9e123921ec327bfdebc4f87072.jpg

The image here reminded me of the second image on this post. The hair is still structured showing the hair falling down the sides but has a more wiggly motion. If I cannot get the hair to be as structured giant crimps I want the hair to look something similar to this at the sides or even a mixture of the two. As long as its a structured curl I will be happy, I don't want any fluffiness at the long parts of hair that will be falling down. This image also shows height of the hair in a quiff at the mid section of the hair. I like the way they've incorporated flower looking designs at the side too, its something I already want to include in my design. 


From this I'm going to draw my final design to make sure it has all the components of inspiration from this post. 

Tuesday, 25 November 2014

Practice Of My Design On Me

My final design was made on my own hair. For the Assessment we're in partners and I'm the designer and model for my own hair. This means I have chosen a look which will be suitable on my own hair.
I feel my partner really studied my design well. And how she put together my hair was really well done in good timing. The hair texture at the back is exactly what I pictured for the look. It's come out with a softer crimped giant style which I like. The texture of my hair was easier to crimp as it has a little more length than my partners and it is finer hair so it holds well. Next time for the assessment I will add more hair product such as hairspray to give the look a stiffer effect. 

I'm pleased with how my parter took on my 'roses' idea for the front of the hair and think it looks really effective. 
I hope the assessment goes as smoothy as my practice run. I feel my partner has excelled at producing a similar look to the design idea proposed. 

Thursday, 20 November 2014

Design Ideas Rough Sketches

Here I've drawn some rough sketches for my partner to follow in a few of the studio lessons I feel design three will be the one I will develop further to use in my final design ideas.


Research: Elizabeth Rex

Elizabeth Rex is a play from 2000. The characters play Elizabeth with a twist of Shakespearean novels. The play has actors which play women which is a little controversial in our day now but in the Shakesperian times this would've been the norm as women were not allowed to act in theatre. 
The hair and makeup in the show is a little scary as the pale white face has been exaggerated as it has to be extra strong pigments in theatre shows so that it shows up for the whole audience. It almost looks as if the actor is wearing some kind of mask. 
The hair on the wig shows tightly placed pin curls. This is the main reason I've researched into the play because of the hair, I love the way the pin curls sit aside of the face and feel this is something I'd like to recreate into my design. 
I like the heart shaped wig and think the wig department in the show have done especially well to recreate that Elizabethan look. I also feel the makeup looks almost similar in photographs to Elizabeths portraiture which is also an interesting point. The costume is very exact showing a laced gown with a large ruff at the back of the neck too. The show was also made into a TV version featured on Bravo.

Reference:http://en.wikipedia.org/wiki/Elizabeth_Rex

Here is an example of the pin curls I want to be shaped around the face.


Wednesday, 19 November 2014

My Design Practice On My Partner: Contemporary Elizabethan

Items used:
Straighteners
Babyliss curlers with a crimping edge
Pins
Clips
Large hairbrush
Sectioning comb


This week I used a more contemporary feel to my models hair. I've incorporated my design idea into this but feel I will make a lot of changes in the next few sessions. I wanted to have a flowing and structured crimped effect at the back and dramatic pin curls at the front. My main focus was to get the right texture of crimp/curls used from my inspiration which was giant crimps. I used straighteners backwards and forward but also used a babyliss curling want to go straight down the hair which worked easier. The hair shows both techniques used but the more squared effect has been created by the straighteners. 

I was pleased with the pin curls I created this week, they were slightly different with a large pin curl effect. This reminded me of one of my research images: http://media-cache-ec0.pinimg.com/originals/f4/d4/e6/f4d4e69aa319cbbd475c958e79b7381a.jpg
I also researched some more flower looking pin curls to find this image:
She has large pin curls which also remind me of a flower!
 http://uk.pinterest.com/pin/366128644681230432/


I feel this image relates a lot to my practice design.

The pin curls here reminded me of roses which I want to incourperate into my final design. Flowers are a sign of purity and richness so I thought of Elizabeth 1.


Next time I would add more body and volume to create quiffs to add a heart shaped effect on my model, this week I felt I rushed the decorative part at the end because I was focused on getting the crimp/curls right, I ensured I had the right tool tested so that my partner would know exactly how to use it. 


Hair 'Rats' and Padding

Items used:

Padding
Boddy Pins
Hair pins (large and thin)
Crimp/curlers/straighteners- Heat appliances 
Sectioning Comb
Paddle Brush

Hair padding is an essential thing to know when styling hair. In the Elizabethan era especially. So looking at padding and rats was something I needed to learn. To add volume without using lots of back combing, padding can be used. We used a scrunch of couch roll bunched up with tights tied over the top. This creates a good base and something which is easily bendable to work around each model.


Usually the section would start at the top of the crown of the models head. Here I've made a 2 inch decorative piece to go ontop of the padding. To pad the hair; section the hair into a cross shape at the front of the hair, this will give each side an even split. Padding is secured first using a running down the back of where the padding will be placed with a section of a small French braid. This is going downwards away from the crown of the head and ending with a thin plat completed at the end of the hair. This is then folded onto itself ensuring that the clips can securely go onto this attaching the padding. You then use padding (today I used couch roll with tights attached around the couch roll secured) this is bendable to be flexible with your designs. Place this in front of your braid and start to secure the padding with pins, poke a hole through the tights and underneath to pin onto the french plat we made to secure the hair. 
It's a more secure way for the hair to not fall out. In my photos I show quite a height with my padding as I used a lot of hair over the top so it became further down the head. To secure the hair underneath it looks neatest if you roll the hair under itself to get a smooth non messy effect. 

I developed my padding this week whilst working on a real person this time. I wanted the shape to be more heart shaped so I move the padding to be further apart from each other on both sides. 
The back did look messy here as I didn't use the rolling technique to hold the hair in place. 
Next time I will use the rolling technique.

This time I put the whole hair up. I used pin curls at the front and the rolling technique at the back with a bun.
I like the way the crimping shows through on top of the padding, it gives it a more decorative feel.

I'm pleased with this outcome as it looks a lot neater and to me more Elizabethan with the heart shaped front. I found padding is something you have to get used to over time to ensure its neat and tidy. I liked the effect the pin curls at the front made and for a final design I'm collecting ideas which could be included with these techniques. 


Saturday, 15 November 2014

AW14 Hair Trends


I've been looking at some of the current trends of Autumn/Winter 2014 to see what is currently in trend and fashionable. I wanted to find styles that maybe suit the Elizabethan era in a more contempory way. I've always loved looking at Avant Guarde and fashion catwalk hair so this was an enjoyable task to search the internet!


On this blog:https://belfash.wordpress.com/ I found some really interesting styles that almost look very 90's style. The images are playful and girly with a high fashion edge. I love the way the designer has incourperated plats, buns, twists and accessories which remind me even more of the tudor fashion in hair. The way the models wear multi coloured clothing reminded me of Elizabeth as well as the high amount of gold they wear symbolising a royal colour. The images show symmetry; this was something the tudor women would almost always have whether it be a heart shaped style or not.
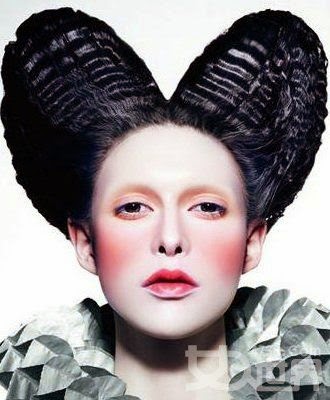
This image reminded me of a 'ruff' type effect on the neckline of the outfit, the model wears a crown like accessory teamed with very pale skin and a fringe braid. 

These earrings really reminded me of something Elizabeth would wear, they have heart shapes on them, they're gold and red and over the top, this was the style Elizabeth stuck to and this is why I feel this image is a great modern contemporary Elizabethan.

The hair in this shot reminded me of a heart shaped look in a modern way. The buns were popular around the 80's/90's but they still have that feel of a contemporary look to me. The model also wears a gold chain like detail on the dress which I found interesting too. 

Looking at fashion images like this really inspire me when it comes to looking at designs which will have an Elizabethan feel to them. I will continue my research to create a look which I feel is appropriate for a New Elizabethan shoot. 

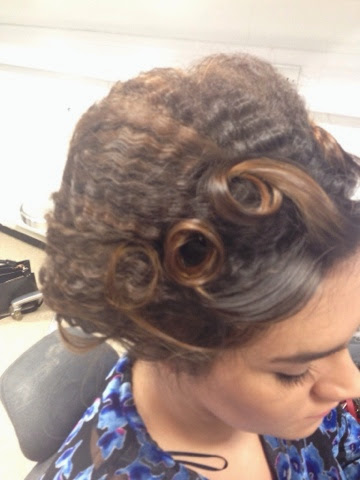
Here are my examples to reflect on the blogs fashion show with these hair styles, I gave the styles a more simplistic outcome but I found it fun experimenting with these fun styles. 


I looked at this bun closely and decided it looked a little like a rose/flower bud shape, I've used the technique of pin curls to make something similar but in a different shape, this is a more modern take on a pin curl. In the centre I've used a plat to wrap around to get this look. I will experiment more to decide what will be suitable for my final idea.

A/W Trend: The Crown Plait

From runway to celebrity to fashion a crown plait is something which will always be a high fashion style. You can incorporate your hair to be like this in many different ways other than placing two plaits on the top of your head! There are some which are cleverly woven into the whole round of the head shaping the face. 

Here shows Mary Kate wearing the style effortlessly in a very messy and contemporary way. I like the way she has her hair almost half up and half down. It reminds me of taking an old style but giving it a new feel. 
This style is one that I love! It reflects back to an old fashioned up do like this but has the plat going all around the head, it reminds me of a ballet dancer almost. Its very neat and perfect giving the style a completely different more formal look compared to Mary Kates. 

This is the original photo I found in a Marie Claire magazine, its a runway look but instead using twists instead of a plait in a symmetrical way. It was named 'Bora Asku's boarding school 'do' This is a runway style for A/W 2014. Reference: http://www.marieclaire.co.uk/blogs/545746/7-hair-trends-you-need-to-know-for-aw14.html


Here are my own attempts of a crown plait, I quite liked the outcome and the way the plait got thinner at the ends near the centre.

I feel this is a Victorian feel to my work and it reminded me of Jenny Shircore's work in 'Young Victoria'.
The back was a little uneven, but I would neaten this up for next time. 


Friday, 14 November 2014

Curling, Crimping and Frizzing techniques

Items used:

Curling tongs
Paddle brush
Sectioning comb
Hair grips
Hairspray

Using different hair tongs can create different looks when curling the hair. There are various techniques of how to curl hair too. We started off with curling using a barrel tong. To make the hair look more Elizabethian curling ontop of the curl with create more of a spiral curl which was more popular in the era. It is important to firstly section the hair to make everything neat and even. One the hair is sectioned use a 2-3 inch piece of hair to curl, get the heated barrel tong and place onto the end of the hair. Twissle the hair up and round the barrel to create a ringlet curl. Hold for a few moments (10/12 seconds) and release the hair by pressing the tong release leaver. The hair should long springy and like a barrel curl at this point. Optionally use a small grip to wrap the hair to secure it in place until the whole look is complete to give a more structured effect so that the curl does not drop. 
Items used:

Crimpers
Paddle brush
Sectioning comb
Hair grips
Hairspray

To crimp the hair use sections again to really make everything neat. This step is most important for crimping I have found as the larger the section, the worse the crimp will look. The sections have to be around 2 inches across (nothing too thick for the crimper) but the thickness should be nothing over 0.5cm otherwise it will be too thick. The crimpers should be preheated, the ones we've used go up to 230 degrees, it depends on how damaged your clients hair is to what temperature to use. If the persons hair is extremely damaged crimping isn't advised but I'd use a lower heat of 100 degrees to not cause any breakage of the hair. Place the crimpers with the small section of hair in at the top of the root, its most effective when the crimp starts from the very top. Press the crimpers down onto the hair for around  3-5 seconds and move on downwards and continue pressing the crimpers down on the hair. I love the way crimping looks and its something that is very long lasting.
Items used:

Hair pins and grips
Straighteners
Sectioning comb
Paddle brush

To frizz the hair you could simply brush out your crimp or you could try another technique. Today I've used a large pin to frizz the hair. This time you have to use even smaller sections to place into the pins. I've started at the front of the hair line to create a front frizz. Firstly use square small sections along the head. start with the wide shaped grip to place on the hair with the top of the grip securing the hair. Start to move the piece of hair out and in between the grip in a zig zag motion almost like knitting! You will then get to the bottom and need to secure the end with a kirby grip. This is what the hair will look like at this point:
You will then press heated straighteners over the grip and hair downwards until you get to the end. This will het up the grips as well as the hair so do not touch this piece of hair until its cooled down. 
Remove all the grips and you'll have this similar effect. You can then style the hair however you'd like to. You could brush this out to create a very frizzy look. 

This is my outcome placing the frizz on top of padding.