Friday, 14 November 2014

Curling, Crimping and Frizzing techniques

Items used:

Curling tongs
Paddle brush
Sectioning comb
Hair grips
Hairspray

Using different hair tongs can create different looks when curling the hair. There are various techniques of how to curl hair too. We started off with curling using a barrel tong. To make the hair look more Elizabethian curling ontop of the curl with create more of a spiral curl which was more popular in the era. It is important to firstly section the hair to make everything neat and even. One the hair is sectioned use a 2-3 inch piece of hair to curl, get the heated barrel tong and place onto the end of the hair. Twissle the hair up and round the barrel to create a ringlet curl. Hold for a few moments (10/12 seconds) and release the hair by pressing the tong release leaver. The hair should long springy and like a barrel curl at this point. Optionally use a small grip to wrap the hair to secure it in place until the whole look is complete to give a more structured effect so that the curl does not drop. 
Items used:

Crimpers
Paddle brush
Sectioning comb
Hair grips
Hairspray

To crimp the hair use sections again to really make everything neat. This step is most important for crimping I have found as the larger the section, the worse the crimp will look. The sections have to be around 2 inches across (nothing too thick for the crimper) but the thickness should be nothing over 0.5cm otherwise it will be too thick. The crimpers should be preheated, the ones we've used go up to 230 degrees, it depends on how damaged your clients hair is to what temperature to use. If the persons hair is extremely damaged crimping isn't advised but I'd use a lower heat of 100 degrees to not cause any breakage of the hair. Place the crimpers with the small section of hair in at the top of the root, its most effective when the crimp starts from the very top. Press the crimpers down onto the hair for around  3-5 seconds and move on downwards and continue pressing the crimpers down on the hair. I love the way crimping looks and its something that is very long lasting.
Items used:

Hair pins and grips
Straighteners
Sectioning comb
Paddle brush

To frizz the hair you could simply brush out your crimp or you could try another technique. Today I've used a large pin to frizz the hair. This time you have to use even smaller sections to place into the pins. I've started at the front of the hair line to create a front frizz. Firstly use square small sections along the head. start with the wide shaped grip to place on the hair with the top of the grip securing the hair. Start to move the piece of hair out and in between the grip in a zig zag motion almost like knitting! You will then get to the bottom and need to secure the end with a kirby grip. This is what the hair will look like at this point:
You will then press heated straighteners over the grip and hair downwards until you get to the end. This will het up the grips as well as the hair so do not touch this piece of hair until its cooled down. 
Remove all the grips and you'll have this similar effect. You can then style the hair however you'd like to. You could brush this out to create a very frizzy look. 

This is my outcome placing the frizz on top of padding. 


Thursday, 13 November 2014

Contemporary Buns

From learning new techniques I've decided to practice different techniques in a more contemporary way at home. I've practiced on a few different models incorporating a modern feel to their hair. 
One style I did I've added french plats and a bun to both incorporated in one style.

Items needed:
Curby grips and pins
Wide tooth comb

This simple style was created with my model who wears a fringe. I wanted part of the bun to be messy and loose so kept a few pieces of hair outside the bun. I firstly made the hair into a pony tale, then twisted the pony tale around using a little backcombing. star to loosely pin the bun in place and tease the hair to give a messier effect.


 This image incourperated a quiff at the front which I thought was interesting.


To incorporate both styles above I decided to section the front piece of my models hair and french braid the front. I then backcombed the back of the bun to give it a more messy effect, twissled a ponytail around and loosely pinned it in place.  


I was pleased with both looks and feel more happy and confident to create more styles as I've had a bit more practice on actual hair. 

Wednesday, 12 November 2014

Research: Alexandra McQueen Spring/Summer 2007 Runway Show

Reference: Alexander McQueen Fashion Show Spring/Summer 2007

Video reference: https://www.youtube.com/watch?v=jDId5vLpgU4
Today I watched the fashion show on youtube here is my short review on the show:

The show started off with an opening scene of a large chandelier moving upwards from the runway. It's dark and the light flicks on with this grand gold lit up light, this instantly reminded me of royalty. Once the models started walking down the catwalk they had an orchestra playing almost creepy erish classical music.

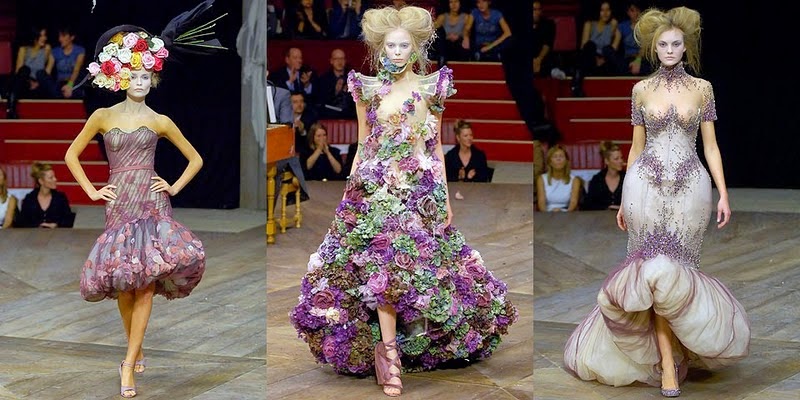
I later noticed how the models all seemed to wear very rich colours, a lot of black gowns, gold pieces. The models had noticeably pale white ghostly faces and you could hardly see their eyebrows. The colour of the models bodies and faces were completely a different colour. The hairstyles were eelaborate tall and very messy and slightly uneven. I noticed a lot of lace and feather details in the gowns of what the models were wearing. One dress had a cut out uunderneaththe chest reminding me of Elizabeths portrait of the Pelican portrait where we see Elizabeth with a cut out of her dress.

Some examples of the dress' worn in the show and some of my favourite looks of McQueens of all time. 

This feathered lace dress screamed 'Elizabethian' to me! It almost looks like a contemporary version of a tudor womens wedding dress!

I love how the hair was almost floating as the models walked through the catwalk it gave them almost an essence of some kind of eroma. Like they'd captured you and you wouldn't be able to stop looking. 

This was one of my favourite dresses shown in the show, such beautiful colours worn with such grace.


I love the way McQueen has cleverly referenced the Elizabethan period in his work. The colour, shapes, makeup and hair all link to show a modern version of the era. 

Friday, 7 November 2014

Hair Types

Hair can be different textures, thickness's etc. We need to accommodate to this when working with different heads of hair. The texture of hair could determinate how you treat it when brushing, washing and styling the hair especially when it comes to using heat. There are 3 main types of hair; fine, medium and coarse. Theres also different types of hair like African Caribbean, Asian or Caucasian hair.

African Caribbean hair is usually the type of hair which is very dark and tightly curled. It is very sensitive hair meaning it will be damaged easily. It has natural oils in the hair which shouldn't be washed as often as e.g. Caucasian hair. The products used on this hair type shouldn't be too heavy on the hair as it is easily damaged. Heat should be kept to a minimum.

Asian hair is usually very straight hair which can be very dark brown/black or medium brown. The texture is usually very strong and can either be fine or thick. Products can generally be used on this hair easily and also heat unless damaged.

Caucasian hair can be a range of any colours from black to very light blonde/white. It can be wavy/curly and straight. Most products/heat can be used on this kind of hair unless extremely damaged.

I've used different models through my practice and taken notes for consultation to make sure they're ok to have their hair styled.

Thursday, 6 November 2014

Heart Shape With A Braid

I've been exploring and expanding my research by looking at contemporary ways to manipulate into old styles. The hair shown on 'Elizabeth' the movie shows structure and shape which is something I wanted to find in a contemporary style. The shape is heart shaped in a middle parting with symmetry which is something typically tudor women would wear. 

The contemporary idea came from http://www.parents.com/blogs/goodyblog/2011/02/a-sweet-heart-braid-for-valentines-day/

I love this idea of a heart shape not taken literally like the old fashioned style but with a heart shape on the actual hair line. I wanted to recreate this and see how easy/difficult it was to recreate here are my results:
I feel I've made a good effort with trying to get each side even but they're not exact as one of the braids started lower than the other side. To improve this next time I will make sure to try and get them more even in that way. 

The technique is using a sectioning comb line a middle parting on your model, use a triangle shape from the crown of the head to the start of the hairline near the face. Start to french braid this towards the face picking up small sections as you go and ensuring to pull hair tightly when you go along. Then the tricky part is when you run out of hair at the triangle and are at the hairline you need to twist and change direction of the braid, this will then continue to braid using thicker pieces of hair, plat half way through to the bottom of the hair, do the same to the opposite side and then attach both braids to themselves.


I was pleased with my outcome and love the heart shape style, I'd even wear this look myself! it definitely a modern feel to a heart shape. I feel its a little too difficult to include something like this to be my final design as it wouldn't always be even.

Tuesday, 4 November 2014

Research: Elizabethan Portraits

Elizabeth had many portraits of herself in the Tudor times. She was almost known for them. Each portrait was very detailed and she often requested certain painters as they would paint her best, almost as if they masked any imperfections, she would make the artist throw the portrait away if she didn't like it. We almost don't have any proof that Elizabeth looked the way she did as paintings she didn't approve of may've shown those imperfections. Elizabeth to me comes across as vein. Portraits had their own fame at this time, they were becoming more and more popular and Elizabeth herself became more and more desirable. The style of portraits developed at this time they were more realistic and elaborate than ever before. Portraits became more popular because of Elizabeth. However, here are a few different and very famous portraits Elizabeth was famous for:


The Rainbow Portrait:
Reference: http://www.andrewgrahamdixon.com/archive/readArticle/245

Here is the first portrait I will be reviewing; The Rainbow Portrait. The photo shows Elizabeth grandly posing with detail all over the painting. She stands with a rainbow in her hand. Elizabeth was fond of her hands and this shows through on each portrait of hers. The outfit is elaborate and expensive looking using rich colours and textures. Elizabeth has accessorise with pears around her hair and neck with lace; these symbolise virginity like the virgin queen. She wears a crown which shows royalty. She wears a ruby in the middle of her chest this signifies the queens heart. She matches the ruby with the rich colours she wears in her dress and also her headpiece which has been woven through to attach to her hair. The main part is the rainbow in this image which is a sign of peace even though her eyes and ears face to the front suggesting that she sees and hears all. The painter was Nicholas Pinyard, the queens favourite painter.

The Pelican Portrait:

Reference: http://www.alaintruong.com/archives/2010/09/14/19060456.html


The Pelican portrait was created in 1575. This is when Elizabeth represented herself to be mother of the people. She wore black, white, red and gold showing her wealthiness within these expensive colours. The 'blackwork' was the embroidery and pattern work which creates lace like patterns. Elizabeth has cherries in her ears in this portraits this could represent her virginity her 'cherry' staying in tackt! The small hole detail in the chest could represent her undying love, mother pelicans will pluck their own chest to feed their babies and could die in the process, this is the representation of Elizabeth having undying love for her people.


The Phoenix Portrait:

Reference: http://www.elizabethfiles.com/elizabeth-i-phoenix-portrait/3945/


In the Phoenix portrait, Elizabeth is shown holding flowers with flower buds all over her costume. She wears a ruff and her hair has an almost invisible type crown on it. She was unmarried at the time and this was her status. A phoenix is a mythological bird which never dies after years consumed by fire and it will be reborn. This could symbolise Elizabeths uniqueness. Nicholas Hilliard was the painter for this image, he painted in miniature. 'He was bred a goldsmith, applied himself to painting in miniature, in which art he chiefly formed himself upon the smaller pieces of Holbein, but never rose to all their excellence.' (James Granger-A biographical history of England, adapted to a methodical Volume 1)


The Ermine Portrait:


In 1585 this portrait was created. An Ermine is a symbol of royalty, an animal of the weasel family with pure white fur, if you closely look at the animal you see the crown it wears. Theres symbolic gravity of the colour black, an expensive colour to create. She wore the famous 3 brothers jewel in the portrait with a sawd of state which resembles justice, almost as if Elizabeth is ready to defend her realm at all costs. The three brothers jewel is made of 'a gem made of three diamonds set in a triangle arounds a pointed diamond. It was one of her most treasured jewels.' -Reference: (photo and quote) http://www.gogmsite.net/the_late_farthingale_era_fr/minialbum_queen_elizabeth_o/1585_ermine_portrait_by_nic.html


The Sieve Portrait

Here Elizabeth is seen to be holding a sieve in her hand. Her hands are elegantly placed in the photo; as we know Elizabeth was fond of her own hands. She wears black, the expensive and most mysterious colour to wear. It looks like Elizabeth has silk around her which was an extreemly expensive fabric too. The sieve is showing Elizabeth reaching back to Ancient women. Its used to glorify Elizabeths virginity. Reference: http://en.wikipedia.org/wiki/File:Metsys_Elizabeth_I_The_Sieve_Portrait_c1583.jpg


The Book Portrait:


Here shows Elizabeth in 1546 as a young Princess. Her skin pale with no imperfections showing through wearing a grand and graceful red and gold royal gown. She wears pearls around her neck which symbolise purity. She holds a book which is from her brother, her fingers are saving a page as if shes just been reading the book as if shes very interested in it which would have pleased her brother. She wears a very elegant dress for someone at such a young age. The painter was Willam Scorts. Reference: http://www.dailymail.co.uk/news/article-2337774/Is-proof-Virgin-Queen-imposter-drag-Shocking-new-theory-Elizabeth-I-unearthed-historic-manuscripts.html

I found it really interesting analysing Elizabthian portraits and feel that in our time today we don't ever see portraits done like this. Now we show objects which symbolise wealth in a different way; handbags, shoes, designer clothing, cars accessories, dogs, phones and engagement rings!


Here shows a recent photo of Scarlett Johannsan. She wears a sun kissed glow which symbolises wealth; she is able to have time to sit out in the sun or have a spray tan or go on lots of holidays. She wears many gems in her necklace showing wealth as well as her designer off the shoulder low cut dress. She appears to be on the red carpet which shows fame and popularity, winning awards etc. But the main focus I can see is her shining white smile and the rock of an engagement ring! Most celebrities have a shiny white smile which is expensive to achieve. The diamons on her hand would cost astonishing amounts but this shows her wealth and richness of todays society. I find it interesting how the opposite features were popular in Elizabethan times, pale skin is no longer very desirable as people want a tan. She had no chance of having any surgery/fillers/implants like todays celebrities are very known to have. Reference: http://www.glamourmagazine.co.uk/celebrity/celebrity-galleries/2010/04/20/celebrity-engagement-rings#!image-number=14

Saturday, 1 November 2014

Health and Safety with Hair Studios

Health and Safety is very important in the hair studios. For least accidents as possible follow these steps:

Use wires safely, do not plug them into a far away socket to stretch the wire, this could cause tripping or splitting of the wire

Be extra careful when using heat on the hair: Do not leave the appliance turned on at any point, Do not have wet hands when plugging things in, Do not use heat near the top of the scalp this will burn your client, do not leave the heat on any surface which will melt instead keep on a cool, dry surface where its not touching anything with the heat. Try not to touch the hair straight after using heat on it to prevent fingers from burning. 

When washing hair do not use an extremely hot heat, This will be very uncomfortable for your client.

When backcombing start from the top and go down but do not tug the hair, this will damage the hair more than needed and could be very uncomfortable for the model.

If any water has been dropped on the floor, clean up immediately incase of people slipping over in the studios. 

Make sure bags are kept neatly under stations and coats are hung up at the entrance.

Throw away anything unhygienic as soon as possible.